
Thursday, June 27, 2013
Pumpkin Flowers
To make a new pumpkin, we begin with pumpkin flowers. There are boy flowers and there are girl flowers. Only the girl flowers will become pumpkins (much to my husband's relief...), so we can eat the boy pumpkin flowers! (... much to my husband's horror!) Girl pumpkin flowers have the bulb, boys don't. Pumpkins are pollinated by insects (i.e. Honey Bees), so if you have pumpkins under a cloche, it is a good idea to open the cloches up, and plant flowers in your pumpkin patch to attract those helper bees!
 Today, I saw the first pumpkin flowers! So excited so excited! I know you shouldn't count your pumpkins before they sprout, but I pumpkin butter is my favorite, and I have a feeling this autumn will be very fruitful for that, fingers crossed!
Tuesday, June 25, 2013
Protecting Catnip!
We have a neighborhood cat...
His name is Oscar.
He is mischievous, and loves to dig up the catnip I plant every year for our own cats.
It took a few years of trial and error, but I finally found a solution to thwart him!
To protect catnip, take an old Culligan bottle, (or really any dome, a glass bowl or such) cut off the bottom and place directly over the plant.

You can also plant catnip in hanging baskets, but I often forget to water those and besides, I find that catnip kinda needs more space than those baskets provide!
Monday, June 24, 2013
Herb Spiral
Medieval Herb Spiral

I think herb spirals are awesome.They are so easy to make:
*a mound of dirt, big or small
*something to ring it, elevated or not
*something to make the spiral (preferably hard. bricks or rocks or even logs)
*herbs of your choosing
*garden art.... or not
I wanted to show off my spiral a little. I kind of think that an herb spiral is among the most magical focal points in the garden (well in my garden.) because it can be so personal, We have planted only herbs that are are perennials (meaning they come back every year. )
The garden art I have hidden in the spiral is an old clarinet (because any music teacher will tell you that some instruments are better off in the garden than in student's hands! this one is really that bad!) a statue of Gaia, and a Treble clef... along with some other things I'm sure I have forgotten about.
I have tried to plant my spiral with regard to directions. (although originally the idea was to create different micro climates...I have never really been able to accomplish that.)
In the North I have bright things. Chives, salad burdet, golden oregano, and comfery. All contrasting, all interesting to me.
In the West - which faces the gate and welcomes visitors
I have calamint, apple mint, sage, bee balm, and lemon verbena, all things that smell good and are welcoming

In the south I have savories. Welsh onion, Bay Leaves, Oregano, Winter Savory. In my garden the south is shaded by the raspberry thicket, and so I think of it as the darkest area in the spiral. I guess I wanted herbs that are good in warm stews to heat up the nights in the winter...

In the east, closest to the house I have planted lemon balm and lovage and sorrel. Both are semi-invasive, and need to be tamed a couple of times a summer. (meaning cut to the ground!) They represent bounty and having more than one needs.
At the top of the spiral, I have Lavender and Sage. Both cleansing and calming plants. The lavender is especially special to me because I imagine my garden to be a place where one goes for calm and joy, That plant does both of those things for me! (And I love it in cookies!!!)
 At the base, I have planted Corsica mint. It is the same plant used in creme de menth. It is lovely, and soft beneath your feet..

I think herb spirals are awesome.They are so easy to make:
*a mound of dirt, big or small
*something to ring it, elevated or not
*something to make the spiral (preferably hard. bricks or rocks or even logs)
*herbs of your choosing
*garden art.... or not
I wanted to show off my spiral a little. I kind of think that an herb spiral is among the most magical focal points in the garden (well in my garden.) because it can be so personal, We have planted only herbs that are are perennials (meaning they come back every year. )
The garden art I have hidden in the spiral is an old clarinet (because any music teacher will tell you that some instruments are better off in the garden than in student's hands! this one is really that bad!) a statue of Gaia, and a Treble clef... along with some other things I'm sure I have forgotten about.
I have tried to plant my spiral with regard to directions. (although originally the idea was to create different micro climates...I have never really been able to accomplish that.)
In the North I have bright things. Chives, salad burdet, golden oregano, and comfery. All contrasting, all interesting to me.
In the West - which faces the gate and welcomes visitors
I have calamint, apple mint, sage, bee balm, and lemon verbena, all things that smell good and are welcoming

In the south I have savories. Welsh onion, Bay Leaves, Oregano, Winter Savory. In my garden the south is shaded by the raspberry thicket, and so I think of it as the darkest area in the spiral. I guess I wanted herbs that are good in warm stews to heat up the nights in the winter...

In the east, closest to the house I have planted lemon balm and lovage and sorrel. Both are semi-invasive, and need to be tamed a couple of times a summer. (meaning cut to the ground!) They represent bounty and having more than one needs.
At the top of the spiral, I have Lavender and Sage. Both cleansing and calming plants. The lavender is especially special to me because I imagine my garden to be a place where one goes for calm and joy, That plant does both of those things for me! (And I love it in cookies!!!)

Sunday, June 23, 2013
Forget sod, plant pumpkins!!!
To Remove Sod, begin with a black plastic pumpkin patch!
My very good friend is moving into a new house, but it has lots of grass... not so good for growing food. I asked her if I could put a pumpkin patch in. For a minimal amount of work, we kill the grass, AND get pumpkins! Come autumn, It's gonna be awesome! Come back, you will see!

Here's how I did it!
Step 1: Lay down black plastic. You can buy a pretty large roll at Lowes for about $20.
Step 2: Cut 2 feet holes in the plastic about 3 feet apart. Pumpkins love space to grow!
Step 3: Dig holes in your holes and mix compost in. Pumpkins are greedy eaters, and they LOVE compost or manure! For my friend's patch I mixed 1/2 a bag of steer manure into each hole, and some slow release organic fertilizer. Manure at Lowes is $1 a bag.
Step 4: Line your holes with something heavy, rocks or such. We had bricks, so we used those!
Step 5: Plant your pumpkins! I have a few varieties I really like, so I planted Cinderella pumpkins,
Orange cutie pumpkins, (I know, they are a hybrid, but I just thought they were so pretty! I couldn't resist!) and baby boo pumpkins. Because I don't plan to plant the seeds next year, I am comfortable with them sharing the same space!
This is really all you need to do... as long as you don't want extra credit points...

For extra credit, I installed a simple watering system. My friend has just bought her house, so I don't want her to spend lots of time watering, so I picked up a rainbird 8 drip watering system and ran hoses to each pumpkin plant. I secured them with some garden stakes, so that the hoses stayed put. Pumpkins really don't like water on their leaves, and are pretty vulnerable to powdery mildew, so conventional sprinklers aren't really all that great. Watering at the base, and watering often makes them happy!
 These photos were taken about 3 weeks after I put in the starts. We are nearing the end of June, so the plants should take off like gang busters any day now!
My very good friend is moving into a new house, but it has lots of grass... not so good for growing food. I asked her if I could put a pumpkin patch in. For a minimal amount of work, we kill the grass, AND get pumpkins! Come autumn, It's gonna be awesome! Come back, you will see!

Here's how I did it!
Step 1: Lay down black plastic. You can buy a pretty large roll at Lowes for about $20.
Step 2: Cut 2 feet holes in the plastic about 3 feet apart. Pumpkins love space to grow!
Step 3: Dig holes in your holes and mix compost in. Pumpkins are greedy eaters, and they LOVE compost or manure! For my friend's patch I mixed 1/2 a bag of steer manure into each hole, and some slow release organic fertilizer. Manure at Lowes is $1 a bag.
Step 4: Line your holes with something heavy, rocks or such. We had bricks, so we used those!
Step 5: Plant your pumpkins! I have a few varieties I really like, so I planted Cinderella pumpkins,
Orange cutie pumpkins, (I know, they are a hybrid, but I just thought they were so pretty! I couldn't resist!) and baby boo pumpkins. Because I don't plan to plant the seeds next year, I am comfortable with them sharing the same space!
This is really all you need to do... as long as you don't want extra credit points...

For extra credit, I installed a simple watering system. My friend has just bought her house, so I don't want her to spend lots of time watering, so I picked up a rainbird 8 drip watering system and ran hoses to each pumpkin plant. I secured them with some garden stakes, so that the hoses stayed put. Pumpkins really don't like water on their leaves, and are pretty vulnerable to powdery mildew, so conventional sprinklers aren't really all that great. Watering at the base, and watering often makes them happy!

Saturday, June 22, 2013
Pear and Lavendar jam
Pear and Lavender Thumb Print cookies!
My word, I am proud of myself. I had 2 pears that were just about to die a slow death in the refrige, and some lavender in the garden, so I am thinking of ways to use them. Here was my solution:
Begin with Lavender sugar:
Cup (or really, any measurement) of suger
6 or 7 lavender flowers - depending on how strong you like your flowers. Remove as much of he stem as possible.
Process these together in a magic bullet, blender, or food processor. The smell is HEAVENLY!
Mix sugar in equal parts with pears on the stove top. I used an immersion blender to help break down the pears more quickly, but I guess you could simmer until the pears are mushy pulp.
Then I used this recipe:
http://allrecipes.com/recipe/thumbprint-cookies-i/
... but I had no wallnuts so I substituted Almond flour.
And I had some other jams that needed to be used up.
and VOILA! Here is my creation!
 PS. Parchment paper is your friend!!!
My word, I am proud of myself. I had 2 pears that were just about to die a slow death in the refrige, and some lavender in the garden, so I am thinking of ways to use them. Here was my solution:
Begin with Lavender sugar:
Cup (or really, any measurement) of suger
6 or 7 lavender flowers - depending on how strong you like your flowers. Remove as much of he stem as possible.
Process these together in a magic bullet, blender, or food processor. The smell is HEAVENLY!
Mix sugar in equal parts with pears on the stove top. I used an immersion blender to help break down the pears more quickly, but I guess you could simmer until the pears are mushy pulp.
Then I used this recipe:
http://allrecipes.com/recipe/thumbprint-cookies-i/
... but I had no wallnuts so I substituted Almond flour.
And I had some other jams that needed to be used up.
and VOILA! Here is my creation!

Paper Bag Baskets
Berry Boxes!
Well, it is berry picking time again, and I am in a pickle! I have too many strawberries! I have frozen 2 gallons, and made lots of desserts, and eaten a ton, but what I would really like to do is share them. But alas there doesn't seem a container suitable for such beauties that shows off their exquisiteness. SO... I did this
 Its a very simple process, and I expect lots of compliments ( I live for compliments!) So here: I show you!
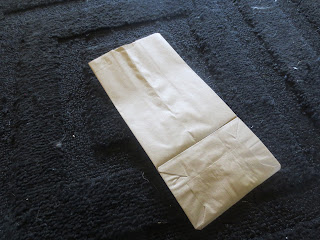


 I re used an old box, cut to size to add some sturdyness, but to save time, a 3x5 notecard also works!
 And there! Done! For all of your berry gifting needs... Perhaps if I am really lucky, I might get eggs in return :0)
Well, it is berry picking time again, and I am in a pickle! I have too many strawberries! I have frozen 2 gallons, and made lots of desserts, and eaten a ton, but what I would really like to do is share them. But alas there doesn't seem a container suitable for such beauties that shows off their exquisiteness. SO... I did this


Subscribe to:
Posts (Atom)